Play Time

At the beginning of each year, my mom and I choose words to live by. They can be actions or descriptions but the purpose is to guide us throughout the year. My word this year is practice. I’ve learned a lot over the last four years here at Hobbies Up To Here and I realized I don’t take a lot of time to practice what I’ve learned. Instead, I rush into new things to learn new techniques rather than putting effort into improving the skills I already have.

So I wanted to focus on this for 2019. Taking time to practice. Making small things. Focusing on one skill and improving it. Create multiples of a project to get in as much practice as possible.

The year has not given me much time for practice. My son decided to play two sports this past season. I’ve been working harder than ever at school. And when I get free time, I tend to choose to do very little. I’m not going to berate myself for this because, #selfcare, but I did decided to venture into my craft room today to create something. Anything.

I went in with a simple purpose: just sit and finish a small project. No worries about perfection. No stress about gifting it to anyone. Hell, it didn’t even need to be anything. Just sit down and sew.

I pulled some scraps and pieced together a simple mug rug with fabric that was already cut. I had no use for this fabric in anything else so I was free to do with them as I pleased.

In a span of 90 minutes, I pieced and quilted. I bound and cleaned up the loose ends. And I was happy with the result. I simplely just allowed myself to play. To practice. To enjoy.

Are there things I would change? Yes. The binding is not my favorite piece. It was too big for such a small project. So I’d change that in the future. Otherwise, I did exactly what I set out to do. I played and practiced and finished a small project.

IMG_2710

Teaching My Son To Sew!

My son is 8 years old. He’s growing like a weed and venturing out into new and unexplored territory. This Spring he played baseball for the first time and he’s reading more and more.

It’s hard to believe that this baby…

102006 020

Is now this boy…

IMG_1129
And after all the years of watching me sew, he’s now interested in it himself. After I brought my sewing machine home from the repair shop, he’s been very curious about the story behind it and what I use it for. He’s watched me repair his costumes and create mug rugs and now he’s ready to learn how to sew!

My favorite part of being crafty with him is watching how his mind works. Seeing how he picks his patterns and colors amazes me. Even without knowing much, he’s got a great eye for color. The end of the school year is upon us and as a gift to his teacher, we plan to make her a bag and a matching mug rug. So together we walked to the craft store and bought some fabric to make her an adorable reservable bag.

He’s a little antsy to get the whole thing started but I had to explain how we had to clean the fabric first and get all the prep work done. He wasn’t thrilled. When everything was ready and it was time to cut, he was STILL frustrated that he couldn’t sew yet. So we sat down to cut our strips for the mug rug.

I’m keeping that pattern simple. Just 2 inch strips sewn together with a simple border and binding and solid backing. I taught Jake how to hold the rotary cutter and how to measure out the strips using the clear ruler and our green rotary pad beneath. Math is a WONDERFUL thing to learn when doing a hands on project. Makes it much more easily understood plus it makes fractions fun.

My lefty

My lefty

At first I couldn’t figure out why the rotary cutter wasn’t working for him then I realized my lefty was angled wrong. He was cutting from the wrong side of the blade so I had him switch his position. Much better!

He did get frustrated more than once with the cutting. He would roll it along the ruler and it would skip across the fabric, only cutting here or there. I explained to him it takes pressure against both the ruler and the cutting pad to cut through the fabric from one end to the other. And then I explained that the time it will take to become good at all this won’t be in a matter of minutes but over a longer period of time. That for some it takes years. This seemed to ease his frustrations and he continued to work on it.

After cutting enough strips we pinned two together and set to work on the machine. He threaded the needle (!!) and took his time to sew a straight simple line. I was soooo proud!!!

20140525-111706-40626042.jpg

And here he is with his first piece! It came together great and he did a fantastic job sewing and cutting. I plan to work a bit with him each day and to remind him that sewing isn’t an overnight project. It takes time and patience, something I hope he will learn to have more of. The side benefit, this project will hopefully strengthen his hand and eye coordination AND build his fine motor skills, an area in which he’s always struggled.

He may not be interested in sewing for long as all 8 year olds tend to jump from interest to interest but I’m thrilled to have someone to share my love of sewing with, even if it is only for the time being.

This mama is super proud!

Side Stitches: Teachers’ Mug Rug Gifts

I love charm packs!

I could buy nothing but charm packs and be completely happy. They come coordinated, organized and pre-cut. What’s not to like?

The other day I got the grand idea to make my son’s teachers and staff at school an end of year gift: Mug Rugs! They went over so well at Mother’s Day that I figured it was a simple and quick gift I could make that would be perfect for saying thank you for a great year.

I went to my stash to see what I had and felt that nothing really fit that summer-y, end of the school year, I’m-a-teacher feeling. So I went online and starting tinkering.

In my search I found two adorable and beautiful packs: Moda Lollipop and Moda Grand Finale. When we opened them up, I almost fell over at the cute of Lollipop and loved the richness of Grand Finale. Jake was thrilled too and together we pulled the packs apart to see what we had to work with.

Moda Lollipop Charm Pack

Lollipop is a sweet set with bright colors, fanciful patterns and lots of cheerfulness and fun combinations. I liked this one best.

Moda Grand Finale Charm Pack

Jake, on the other hand, loved working with Grand Finale, which was a shock to me. I was expecting the playful colors of Lollipop to draw him in but no, he worked solely with Grand Finale and I let him. These were for his teachers, anyway.

Two of Jake's color combos....not a bad start

As apart of the project, I let Jake pick the color combos. I had him pick three colors, telling him to keep it simple with two patterns and one solid. Took him a bit at first to get the hang of picking a solid that was found in one of the patterned swatches. His first picks were not too bad.

Getting better at it....

Then he started getting the hang of it. While I was apart of the process, Jake did most of the color choosing. As you can tell, he worked in the Grand Finale pack primarily and every once in a while I’d get my hand in and stick a swatch of Lollipop in there.

Hey, I think he's got it!

His last set was my favorite (and probably because he used all Lollipop colors). I was so impressed with his choices that by the end, I felt there was no reason to tweak anything he put together.

My plan for now? To cut one pattern and one solid square into four squares and sew them together, alternating like a pinwheel. Then I’ll use the last pattern swatch and use it in it’s entirety. No cutting that one.

This it the rough drawing of what the mug rugs will be. A solid on one side and a small pattern cut from two swatch on the other side. Simple. Minimal cutting and sewing. Yet classy and a nice gift to give.

Weekend Update: Blah to the Blah!

This weekend was, well, a nothing weekend. We did…well…nothing.

Ok not really nothing but it was a pretty mild weekend, which to be honest, was nice. We’re usually so GO GO GO that it was a peaceful break in the routine to take it slow and be spontaneous.

On Saturday, we were looking forward to the little man’s first swim lesson only to be disappointed with an “accident” that closed the pool. Because of the closure the lesson was canceled and we were told to reschedule the set of lessons for another month.

Excuse me!? I was bummed because our summer is pretty tightly scheduled and picking another month to do his lessons would put him out till August. He won’t be around the end of June or the beginning of July due to a visit up north. Sigh… I wish they had a back up plan for incidences like this.

Now we’re looking into other swim lesson options.

Also on Saturday I was involved in a two hour Zumbathon! If you like to dance and workout, Zumba is a great option. I love it and even after two hours worth of dancing till I was dead tired and had burned over 1700 calories, I’m still in love with it. Can’t wait till my next class!

Then Sunday was completely open and we filled it with not a whole lot of exciting stuff.

Fun, no?

So my update isn’t all that big of a deal this week but I will say I have the itch to sew tonight so I’m planning on a nice night home with the kidlet to do some gardening and some mug rug making. The end of the school year is but 2 weeks away and as a gift to his teachers I’m planning on making some simple mug rugs. Jake has two teachers plus a host of other helpers around campus so I’m thinking simple yet cute mug rugs would be great gifts.

Java Stash!

My stash has grown some in the last couple of months. And my latest additions were very themed. I was working on some mug rugs for Mother’s Day and decided what better way to make a mug rug than to incorporate some java and cafe fabrics.

Oooooh Java!Oh la la!

Lucky for me, Moda makes a great set of java inspired fabrics. And I splurged and got the BIG set. When that thing arrived I let it sit for awhile and just stared in awe at its beauty. It was so well organized and there were so many inspiring patterns! And it was so pretty I hated to open it up to use them while at the same time I couldn’t WAIT to cut into some of those great coffee bean patterns.

The bottom fabric is a Deb Strain for Moda in the pattern Bistro. It was PERFECT for the little rugs because if you cut it just right, the wording can stand out like a picture framed.

Using the worded border.

See? Doesn’t it look like I embroidered the words on it? Everyone asked if I had and were pleasantly surprised when I said that no, I had just cut the material perfectly to fit into the rug and make it look like I had hand printed the words espresso and latte.

Oh la la!

And, I added some French Cafe styled prints! I love black/red/white themes so I had fun with this one. And I didn’t even get to cut into the red Eiffel Tower print or the flowery black and white fat quarter on the end. Those I’m saving for another mug rug in the future.

I will say this, picking a theme in fabrics for a project that I am working on helps to encourage me. Working with the java/cafe theme for those mini quilts made to be used under a coffee mug powered me onwards to see what I could come up with using the fabrics I had bought for just this project.

Mother’s Day Java Mug Rugs!

My brain works in mysterious ways.

I tend to get great gift ideas. Like blow your socks off great ideas.

But I get these ideas late without much time to execute these great gift.

This year is no different. I had this fabulous idea to make mug rugs for the mothers in my life.

Of course this would require fabric, planning, cutting, sewing and time. And I had a week…

Sigh…The shipping alone on the fabric took three days so in the end I had four days to make four mug rugs.

But I did it! I stuck with my plan and made four adorable little gifts that each mother raved about! It felt so good to set out a goal, accomplish it and then see the results bring smiles to the faces of the receivers.

Mother's Day Gifts

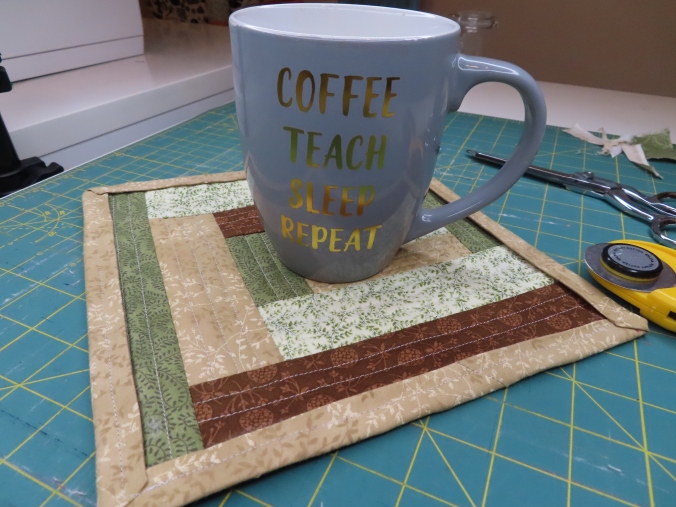
I made one for The Guys mother, which I posted about earlier. That one I called The Espresso Mug Rug. It came out a square 8×8 and I was impressed with my first go-round.

Espresso Mug Rug

Cute no?

Mitered Corner of Espresso

I struggled a bit with the binding because I felt a full 2 1/2 strip folded down and sewn would be too bulky for such a small project. Well I didn’t take into consideration that my seam allowance would be the same if I didn’t adjust it. And of course, I didn’t so I had to do some trimming to get the binding to fold over properly.

Coffee....

The Cafe Windows Mug Rug

This one I lovingly called The Cafe Windows Mug Rug. I had a fat quarter with these adorable red/black/white squares that looks like little advertisements for different types of coffee drinks you’d buy in a cafe. I got the bright idea that I’d cut four of them out and frame them like little windows.

Cafe Windows

The left side

Not bad overall but I made a few mistakes planning it out. First, I didn’t add a top or bottom border because I wanted it to be more rectangular than square. Because I didn’t give myself an allowance around the squares, I ended up binding over the quilting. You can’t really tell unless you are a quilter and looking at it really closely.

Cup O Joe Mug Rug

This one is the Cuo O Joe Mug Rug. Now this one I both love and hate. I love the quilting on it. I decided to quilt just that inner rectangle. And to do that, I pulled the last stitch in between the layer and anchored it down with a seam across the top and bottom.

But the binding on this one, my oh my, what a pain in the ass. I can’t tell you exactly what I did wrong. All I know is that it’s a mess. I can see it because I know, I was there, but this could have been so much prettier had I taken more time to work out the binding.

Corners

Messy messy

I may attempt this one over again and see if I can make it neater.

Beans Mug Rug

Coffee Beans Mug Rug

This last one is my favorite of the bunch because it’s different. Again, the binding is atrocious (Look away all you excellent quilters…LOOK AWAY!!!) but the colors, the quilting and the design are just adorable.

Coffee Beans

So cute!

Yes…I have no words. This one is self explanatory.

In the end I could make a mug rug from start to finish in about 3 hours. At least the length of a full movie with a little added time before and after for prep and clean up.

Mother’s Day… a day to celebrate the women in your life. I happen to be blessed with a fabulous mom and two wonderful grandmothers. All of them have been such big impacts on my life that I was more than happy to make these little rugs. With all the sweat and tears that went into them, I knew it was nothing close to what they’ve gone through for me.

And to add to the happiness of the holiday, I got to spend some of it with a new woman in my life. Someone who knew me as a child and as a friend to her son. Now, we’re both adults and both mothers with a lot in common.

To these women and all the other women in the world in the role as mother (whether by giving birth, adopting or because it’s just your nature to nurture) Happy Mother’s Day everyday. Without all of you, we’d be savage little buggers living a Lord of the Flies kind of life.

We love you!

Side Stitches: Java Mug Rug

I am an avid Googler. Sometimes, that’s to my downfall as I find things I don’t EVER EVER EVER want to see again (for example The Human Centipede…yuck. I won’t even link to that movie). When I Google and find something I didn’t EVER want to know existed, I put myself in Google time-out.

No more Google for you!! says my conscience, The Google Nazi.

But, there is always a good side to everything. And in my case, my Google-fu can bring me lots of wonderful knowledge and great ideas. I’ve learned how to bind a quilt, I’ve found some great companies that sell natural and organic bath and body stuff, and my son and I Google all his big questions like “What makes a planet a planet?” and “What period did the Allosaurus live in?”

Google is also good for introducing you to new quilting projects you just HAVE to try.

As if I need another side stitches project, I decided to attempt my very first mug rug. What is that, you ask? Well check out this post about mug rugs on Two More Seconds.

A mug rug is technically a mini quilt complete with binding and batting. Small and quick to make, they are called mug rugs because they are bigger than a coaster yet smaller than a place mat and make a great parking place for your mug of hot joe in the morning and a muffin.

Of course, I’m Googling things to make and I’m subscribing to quilting sites left and right when I spot my first post about mug rugs. Initially, I thought they were mud rugs and couldn’t for the life of me figure out what to do with a mud rug. Then I received a pleasant email from a quilter saying I should try my hand at making my first “mug” rug for practice on binding and with that, I took to Google.

Oh what a trove of precious treasures I have found!! People LOVE these things! So of course I had to make one myself.

image

Front of the mug rug

Here is my very first mug rug attempt. Beautiful, no? I’m so pleased with this damn thing that I can’t wait to get home and start the next one. It came out to 8 inches x 8 inches. I wanted to try a binding of a different size so I cut my strips down to 2 inches instead of my previous 2.5 inch binding size. Man, that was a pain in my ass.

Though the slimmer binding looks great with this smaller project, my poor machine struggled to get through the multiple layers and the bunching in the corners because everything was so tight. While I like the look of the slimmer border, I may have to reconsider binding the next one in the same way.

image

Back of the mug rug

And not that I needed any excuse to buy more material for my stash, I went out and picked up some java themed fabrics from. Got a GREAT deal on eBay for the Moda Java fat quarts set and also bought a French cafe styled bundle to mix and match. And without realizing it, the Moda Full Circle set I already had for my fresh pears table runner mixes in, too! So I was able to use some of those scraps and leftovers in this mug rug.

This went so fast and smoothly I’ll be attempting more this week with different patterns and styles and fabrics. There is just so much versatility I just see endless possibilities. Also come back to view better pictures of the rugs themselves and also of the fabric I bought for this project.