To be honest, I’ve never been a fan of yellow. It just doesn’t appeal to me, or hadn’t appealed to me until I made this beautiful Curved Log Cabin quilt for my daughter Jennifer.
I got the pattern from a Missouri Star Quilt Company tutorial. Trust me, I’ll be making this quilt top again and again! It was fun and easy. I have a few jelly rolls that are just begging to be made into another Curved Log Cabin configuration.
I chose a 2 1/2″ jelly roll of Summer Breeze lll fabrics by Moda. The blues and yellows in various florals, made for wonderful contrasts that helped to define the curve in the log cabin blocks. The key, however, is the use of a white jelly roll in 1 1/2″ strips.


Aren’t they fabulous?

I love the variations of yellows and blues!

Using one of the Summer Breeze strips as a center for the Log Cabin block instead of the traditional red or green, caused me to come up a bit short of fabric choices. I ended up buying a second jelly roll. No worries! I used strips from the second roll to bind the quilt. It worked out well! Putting the blocks up on my design wall, I was tickled to find there were still many different designs that kept the curved look.

I decided to add two borders. First I used some of the white 1 1/2″ strips I had left, then I purchased more of the Summer Breeze lll fabric in the darkest blue shade to offset the yellow. I also used this blue fabric for the backing.

Time to quilt! I used a new basting technique, a basting gun, which I reviewed here. Not my fav way to baste, but I’m glad I tried it!
Turning to Christa Watson’s book Machine Quilting With Style, I found the quilting diagram on page 26 of her Ripples quilt to be perfect for this quilt. I used a serpentine stitch already programmed into my machine, and set to quilting with white Isacord thread. I love the ease and sheen of this polyester thread, and almost exclusively quilt with it.
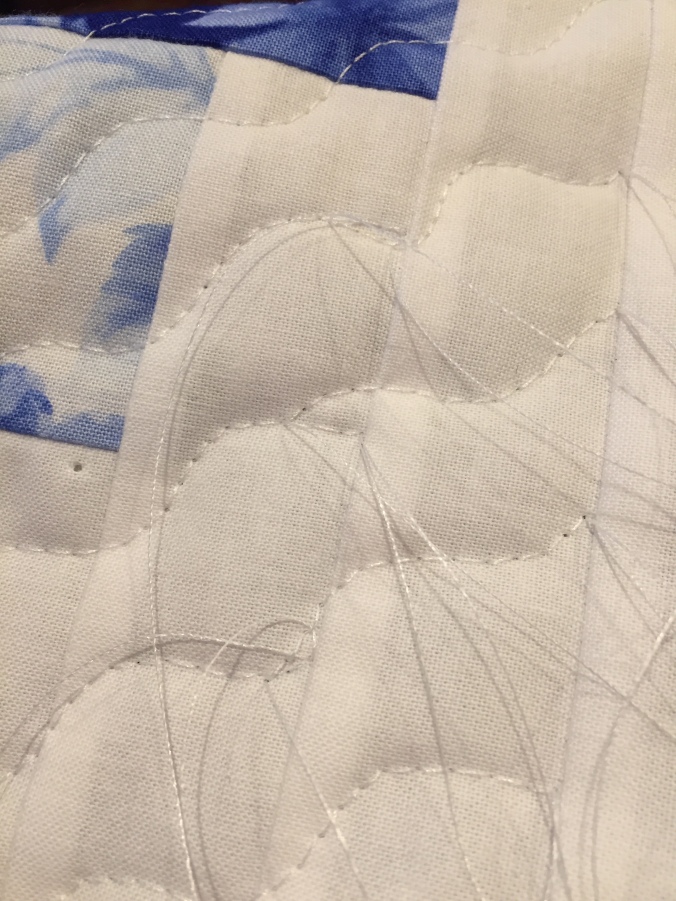 Lots of threads to bury lol! As you can see, I had a few “booboos”. I patiently “unsewed” the over lapping threads, knotted and buried them. And that hole you see? That was made by my basting gun. It closed up nicely, however, when the quilt was washed. Whew!

A nice compliment to the squareness of the blocks!

Annnnn voila! I used various strips from the Summer Breeze lll jelly roll to bind the quilt.

And yes, that’s the doily my hubby recently crocheted!

Thanks to suggestions from the Twilters group on Facebook, I decided to continue the same serpentine quilting pattern around the border.

I like sewing the binding to the front of the quilt, then hand sewing it to the back. Adding a personalized label is the final TA DA!!! before putting it in the wash.
Here’s a pretty good look at the design. Looove it!

Happy Friday everyone!
Dori
Check out our side bar for some great quilting link ups! This post will be linked over at Crazy Mom Quilts.
Like us on Facebook: Hobbies Up To Here
Subscribe to us on iTunes: Hobbies Up To Here
Check out our YouTube channel: Katie V. with Hobbies Up To Here
Tune in for some Periscope fun: Katie V.
And follow us on BlogLovin: Hobbies Up To Here
Pop by on Instagram: Hobbies Up To Here

Good Morning! What a beautiful quilt. I had never heard of the term curved log cabin, but it is a lovely design. You did a great job quilting it too ~smile~
Roseanne
Good morning Rosanne!
Thank you so much!
The term was new to me too. I love how versatile the log cabin block is, and this variation really opened up new possibilities. I hope you try it!
Hugs,
Dori
So pretty! Thank you for linking to TGIFF!
Good morning Lisa! Thank you so much!
Hugs,
Dori
I love your beautiful log cabin quilt! You chose the perfect fabric too.
Good morning Sharon!
Thank you! I can’t wait to make a Christmas version…😍
Hugs,
Dori
Beautiful!! Love the way you finished it with the thin white border and the wide blue one.
Thank you Karen!!! 🤗
Hugs,
Dori
Absolutely gorgeous 🙂 I’m sure your daughter loves it! Great job!
Good morning Lori!
Thank you so much!! And yes! She sure does! Yayyy!🤗
Have a wonderful weekend!
Dori 💝
Beautiful! Was searching layouts for this particular quilt to make my daughter one. Yours is just gorgeous! Love your fabric choice. (I’m planning on doing mine with Maywoods new line, Heather). Would you think you’d have enough in one jelly roll if you’d used a non jelly roll fabric for the center 2.5″ square? (I have one jelly roll, and 2 yards each of 2 coordinating fabrics (for borders and binding) that I already purchased for this). I’m nervous now seeing that you ended up needing a second jelly roll….. Do you recall what you cut your borders at? 1.5″ for inner and 6.5″ outer? Thanks!
Hi Leanne!
I apologize for taking so long to respond. Meh!
Thank you for your kind compliments and for taking the time to leave a comment. You are much appreciated!
Yes, I think I would have had plenty to work with in a jelly roll if I would have chosen a non jelly roll fabric. I think you’ll be just fine!
If I remember correctly, I used strips left over from the white 1 1/2″ kona jelly roll I used for my blocks. I think I cut 4 1/2″ strips for the outer borders. I didn’t document the measurements, and my daughter has the quilt, so I’m going off of my memory. 🙂
Please keep me in the loop as to your progress on your daughter’s curved log cabin quilt. I can only imagine how lovely it will be!
Warmly,
Dori
Pingback: Top 5 Hobbies Up To Here Posts of 2017 | Hobbies Up To Here
Pingback: Top 5 Hobbies Up To Here Posts of 2018 | Hobbies Up To Here
Dori and Katie,
Thank you for sharing your lovely quilt with us. I love the Summer Breeze III collection. Blues, yellows, and white lift the spirit. I am creating a website about log cabin quilt rulers. Would you mind if I use one of your photos for an example of what a curvy log cabin quilt looks like? I would be happy to credit you and put a link to this website.
Thank you.
Good morning Donna!
Thank you for your kind comment! You are more than welcome to use a photo of my quilt on your website. Thank you in advance for giving me credit and adding a link to our website.🤗
Best wishes,
Dori (and Katie!)